The engine wiring harness is the nervous system of every modern internal combustion engine — a precisely engineered bundle of 40–200+ wires, sealed connectors, and protective sleeving that links the ECU to every sensor, actuator, ignition coil, and fuel injector. When it fails, the engine doesn’t run. When it’s poorly built, it fails on the side of the highway, in a field, or on a production line at 2 AM. This guide covers what an engine wiring harness actually does, how to recognize failure before it strands you, real replacement costs in 2026, and what separates an OEM-grade harness from a $200 import that lasts 18 months.
It’s written from the perspective of a custom automotive wire harness manufacturer that builds engine harnesses to IATF 16949 standards for OEMs, equipment makers, and aftermarket performance shops across 70+ countries.
What Is an Engine Wiring Harness?
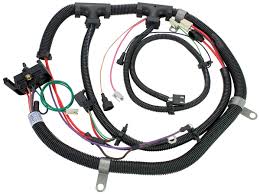
An engine wiring harness is an organized assembly of insulated copper conductors, sealed connectors, terminals, fuses, relays, and protective tubing that routes electrical signals and power between the engine control unit (ECU) and every electrically operated engine component.
It’s not just “wires bundled together.” A modern engine harness is a designed system with five jobs:
- Power delivery — Carries battery current to ignition coils, fuel injectors, and the starter solenoid through circuits sized for 0.5V maximum drop under peak load.
- Sensor signal transmission — Delivers analog and digital data from O2 sensors, MAF, MAP, knock sensors, crankshaft position sensors, and camshaft position sensors to the ECU with less than 0.1V signal-line drop.
- Actuator control — Carries ECU commands to injectors, ignition coils, throttle bodies, variable valve timing solenoids, and turbo wastegate actuators.
- CAN bus and diagnostic communication — Routes high-speed CAN, LIN, and FlexRay traffic between the ECU, transmission controller, and body modules at speeds up to 1 Mbps.
- Physical protection — Shields conductors from 250°F+ heat, constant vibration, oil, coolant, road salt, and mechanical abrasion using corrugated tubing, braided sleeving, and high-temperature tape.
How an Engine Wiring Harness Works
The harness operates as the engine’s central nervous system, with the ECU acting as the brain. Sensors at every critical location generate data — exhaust oxygen content, intake air mass, crankshaft angle, knock vibration — and the harness carries those signals to the ECU within microseconds. The ECU processes the data and sends commands back through the same harness to actuators that adjust fuel quantity, ignition timing, valve timing, and boost pressure in real time.
A modern V6 engine cycles this loop roughly 6,000 times per minute at idle and over 15,000 times per minute at redline. Every signal must arrive with the correct voltage, in the correct order, with the correct timing. A single corroded ground connection or chafed sensor wire can introduce noise that the ECU interprets as a knock event, triggering fuel enrichment and timing retard that costs you 15% fuel economy without ever throwing a code.
Types of Engine Wiring Harnesses
Vehicles use multiple harnesses divided by thermal zone and function. The “engine harness” specifically refers to the assembly under the hood — but understanding the full system matters when diagnosing problems that cross zones.
| Harness Type | Location | Wire Gauge Range | Temperature Rating | Primary Function |
| Engine harness | Engine bay, terminates at ECU | 14–22 AWG (signal), 10–12 AWG (power) | 150°C minimum (TXL/SXL) | ECU to sensors, injectors, coils |
| Battery harness | Battery to starter/alternator | 4–2 AWG (some 1/0) | 105°C (SGT) | Starting and charging current |
| Body harness | Cabin, behind dash | 18–22 AWG | 85°C (GPT/TWP) | Accessories, lighting, HVAC |
| Chassis harness | Undercarriage | 14–18 AWG | 105°C, oil/salt resistant | Tail lights, ABS sensors, fuel pump |
| Door harness | Door cavity, flex zone at hinge | 18–22 AWG, 19+ strand | 85°C, high-flex rated | Power windows, locks, speakers |
| Airbag (SRS) harness | Steering column, seats, doors | 20 AWG twisted shielded pair | 105°C | Crash sensor to airbag deployment |
| Transmission harness | On/inside transmission case | 18–20 AWG | 150°C ATF-resistant | Solenoids, speed sensors, TCM |
Engine harnesses handle the harshest environment in the entire vehicle. They sit inches from exhaust manifolds reaching 700°C, get sprayed with coolant and oil, and must survive 100,000+ thermal cycles over 15 years. This is why OEM engine harnesses use TXL insulation rated to 150°C minimum, sealed Aptiv/TE/Molex connectors with secondary locks, and braided abrasion sleeve at every contact point.
Common Engine Wiring Harness Failure Symptoms
Harness failures follow predictable patterns. Catching them early prevents cascading damage to the ECU, sensors, and the engine itself.
Early Warning Signs (Catch It Here)
- Intermittent Check Engine Light — Especially when triggered by bumps, hot weather, or after rain. This points to chafed insulation, corroded grounds, or marginal connector pin tension.
- Misfire codes on multiple cylinders — P0301 through P0308 simultaneously suggest a common ground or shared power circuit fault rather than individual coil failure.
- Sensor codes that clear and return — P0131, P0151 (O2 sensor), P0102 (MAF), P0335 (CKP) that disappear after disconnecting and reconnecting wiring strongly indicate connector or pin issues.
- Mysterious fuel economy drop — A 10–15% MPG decrease without other symptoms often traces to a chafed knock sensor wire feeding noise to the ECU.
Mid-Stage Failure Symptoms
- Hard starting or no start — When power circuits to the starter or ECU degrade, cranking becomes unreliable.
- Random stalling at idle — Loose or corroded ECU power/ground connections cause complete ECU resets mid-operation.
- Erratic gauge readings — Tachometer or temperature gauge jumping randomly indicates signal-line interference from a degrading harness.
- Battery drain — Damaged insulation creating a path to ground through a fuse-protected circuit will drain the battery in 24–72 hours.
Critical Failure Symptoms (Stop Driving)
Pull over immediately if you experience: burning plastic smell from the engine bay, smoke under the hood, complete electrical loss while driving, or visible melted wire insulation. A shorted harness can ignite within minutes once insulation breaks down. Engine bay fires from harness failures cause an estimated 30,000+ vehicle losses annually in North America alone.
Why Engine Wiring Harnesses Fail
Engine harness failures concentrate in five predictable locations and causes. Understanding these helps you specify better replacements and helps technicians diagnose faster.
| Failure Location | Root Cause | Average Onset | Prevention |
| Firewall pass-through | Constant flex from engine torque + grommet UV degradation | 8–12 years | Replace grommet at each major service; use flex-rated wire |
| Valve cover routing | Heat cycling cracks insulation; oil seepage attacks jacket | 6–10 years | 150°C minimum TXL/XLPE insulation; oil-resistant sleeving |
| Exhaust manifold proximity | Radiant heat above 250°F continuously | 5–8 years | Reflective heat shield sleeving; reroute if possible |
| Battery terminals & grounds | Corrosion from acid vapor + galvanic action | 3–5 years (salt areas) | Annual cleaning; stainless hardware; dielectric grease |
| O2 sensor / CKP connectors | Heat + vibration breaks down connector seals | 7–10 years | OEM-spec sealed connectors only; never zip-tie repairs |
| Rodent damage | Soy-based insulation (post-2010 vehicles) attracts rodents | Any time | Capsaicin tape, repellent sprays, garage storage |
Operating environment dramatically affects lifespan. A harness in Arizona dry heat will outlast the same harness in Michigan salt-belt service by 40–50%. Plan replacement intervals accordingly: 15 years dry climate, 10 years coastal, 8 years salt-belt with daily winter driving.
The Real Cost of a Faulty Engine Wiring Harness
Ignoring a degrading engine harness costs more than the harness itself in three ways:
- Collateral component damage — A voltage spike from a failing harness can destroy a $1,200 ECU. Continuous lean operation from a noisy O2 sensor signal burns valves and pistons.
- Diagnostic labor — Intermittent electrical faults are the most expensive diagnostic category in any service shop. Expect $150–$400 per hour of diagnostic time before any actual repair begins.
- Fire risk — A short-circuit fire totals the vehicle. Insurance covers it, but the deductible and rate increase often exceed $3,000.
Engine Wiring Harness Replacement Cost in 2026
Real-world replacement costs in 2026, broken down by vehicle category and labor scenario:
| Vehicle Category | Parts Cost | Labor Hours | Labor Cost (@$150/hr avg) | Total Range |
| Compact car (Honda Civic, Toyota Corolla) | $300–$700 | 3–5 hours | $450–$750 | $750–$1,450 |
| Mid-size sedan (Camry, Accord, Altima) | $500–$1,000 | 4–7 hours | $600–$1,050 | $1,100–$2,050 |
| Full-size pickup (F-150, Silverado, Ram) | $700–$1,500 | 5–8 hours | $750–$1,200 | $1,450–$2,700 |
| European luxury (BMW, Mercedes, Audi) | $1,200–$3,500 | 8–14 hours | $1,600–$2,800 | $2,800–$6,300 |
| Diesel truck (Cummins, Duramax, Power Stroke) | $1,000–$2,500 | 10–16 hours | $1,500–$2,400 | $2,500–$4,900 |
| Turbocharged sports car | $1,500–$4,000 | 12–18 hours | $1,800–$2,700 | $3,300–$6,700 |
| Heavy equipment / agricultural | $800–$2,000 | 8–20 hours | $1,000–$3,000 | $1,800–$5,000 |
Two cost factors drive the wide ranges:
- Engine accessibility. Transverse-mounted V6 engines under intake plenums easily double the labor time of an open inline-4 layout. Turbocharged engines with intercoolers, downpipes, and tightly routed plumbing add 6–10 hours of disassembly alone.
- OEM vs aftermarket parts. Dealer-only OEM harnesses run 2–3× the price of equivalent quality aftermarket. A reputable custom automotive wiring harness built to factory specs typically costs 30–50% less than the dealer part with equal or better materials.
Repair vs Replace: How to Decide
Spot repair on engine harnesses is rarely a good idea. Once insulation degrades in one section, the rest is on the same clock. That said, judgment call by scenario:
| Scenario | Recommended Action | Why |
| Single connector damaged | Repair connector only | Heat-shrink solder splice with OEM connector is reliable for 5+ years |
| 2–3 chafed wires in one location | Splice repair + protective sleeving | Localized damage, rest of harness sound |
| Multiple failure points across harness | Full replacement | Indicates whole-harness insulation degradation |
| Rodent damage to multiple circuits | Full replacement | Hidden damage often exists beyond visible bites |
| Vehicle older than 15 years, intermittent codes | Full replacement | Insulation reaching end of life across entire harness |
| Engine modification (turbo swap, EFI conversion) | Custom harness | OEM harness lacks circuits for new components |
How to Replace an Engine Wiring Harness
Engine harness replacement is intermediate-to-advanced DIY work. Document everything before you start. Skipping a single ground connection or pin orientation creates problems that take days to find.
Step-by-Step Process
- Disconnect the battery. Negative terminal first. Wait 15 minutes for capacitors in the ECU to discharge. This is non-negotiable.
- Document everything. Take 100+ photos from every angle. Tag each connector with masking tape labeled with location and ECU pin number. Spend 2 hours here to save 20 hours later.
- Remove peripheral components. Intake manifold, valve covers, throttle body — whatever blocks harness access. Bag and label every fastener.
- Trace and unclip the old harness. Follow every branch. Don’t cut zip ties yet — they tell you the OEM routing.
- Disconnect connectors in reverse order of installation. Start at the farthest sensor, work back to the ECU.
- Remove the old harness as a single unit if possible. This preserves it as a routing reference.
- Install the new harness with same routing. Match every clip position, grommet, and zip-tie location. Heat shielding and abrasion sleeving in original locations.
- Connect from ECU outward. Confirm each connector clicks fully. Pull-test each terminal.
- Test ground continuity. Every ground point should read below 0.5 ohm to battery negative. Above 1 ohm causes intermittent faults.
- Reconnect battery and run diagnostic scan. Clear stored codes from the swap process. Test-drive for 50+ miles to verify no new codes return.
When to Hire a Professional
- Vehicles with security/immobilizer systems integrated with the harness
- European luxury vehicles (BMW, Mercedes, Audi) — programming required after installation
- Diesel trucks with integrated emissions systems
- Hybrid or EV powertrains (high-voltage harness work is fatal if done wrong)
Engine Harness Specification: What OEMs and Engineers Care About
For procurement teams, equipment manufacturers, and serious aftermarket builders, harness selection is a specification exercise, not a price comparison. The harness that costs $200 less but uses 18 AWG where 16 AWG is required will create voltage drop issues that show up as P0420 codes 8,000 miles later. Five specifications matter:
1. Wire Insulation Temperature Rating
- GPT/TWP (85°C) — Body and accessory circuits only. Never use in engine bay.
- SXL/GXL (105°C) — Acceptable for cooler engine bay zones, away from exhaust.
- TXL (125°C) — Standard for modern engine harness work. Thinner jacket allows tighter routing.
- SAE J1128 SXL with XLPE (150°C) — Required for routing within 6″ of exhaust components.
- Fluoropolymer/PTFE (200°C+) — Turbo applications, race engines, EV motor controllers.
2. Wire Gauge and Strand Count
Match or exceed OEM gauge. Dropping 16 AWG to 18 AWG saves the manufacturer pennies but creates a 0.4V drop on a 10A injector circuit — enough to delay opening time by 200 microseconds and lean out cylinder 1 at WOT. For flex zones (firewall pass-throughs, door hinges), specify 19-strand minimum; 7-strand wire fatigue-cracks within 50,000 hinge cycles.
3. Connector Selection
Engine bay connectors must be sealed (IP67 minimum) with secondary locks. Use only proven brands: Aptiv (formerly Delphi/Packard), TE Connectivity (Deutsch, AMP), Molex, JST. Generic Chinese clones look identical but fail crimp pull tests at 30–40% of spec values. Verify the connector body part number and the terminal manufacturer separately.
4. Crimp Quality and Process Control
Crimp pull force per SAE/USCAR-21 is the single best indicator of harness quality. A 16 AWG terminal should pull at minimum 110 N (24.7 lbf). Reputable manufacturers like OUKETECH publish actual pull test data on certificate of conformance documents — vendors who quote “meets industry standards” without numbers are hiding problems. Production crimping should use servo-driven applicators with force monitoring and CFM (Crimp Force Monitoring) on every terminal, not pneumatic presses operated by feel.
5. Manufacturing Standards Certification
- IPC/WHMA-A-620 — Industry standard for cable and wire harness assembly acceptance. Class 2 for commercial, Class 3 for aerospace/medical.
- IATF 16949 — Mandatory for automotive OEM supply. Adds PPAP documentation, APQP processes, statistical process control.
- ISO 9001 — Baseline quality management system. Required but not sufficient alone for automotive work.
- UL/CSA certifications — For specific wire types and assembly classifications.
OUKETECH operates a 5,000 m² IATF 16949 and ISO 9001-certified facility producing engine wiring harnesses and broader custom wire harness assemblies for global OEMs. Every harness ships with traceable component data, including wire lot codes, connector manufacturer part numbers, and crimp pull force records.
Custom vs OEM vs Aftermarket: Which to Buy?
OEM Dealer Harness
Pros: Guaranteed fitment, factory-original specifications, dealer warranty coverage.
Cons: Highest price (often 2–3× alternatives), discontinued for vehicles 15+ years old, slow availability.
Choose when: Vehicle under warranty; insurance-paid repair; rare luxury vehicle where fitment risk justifies premium.
N.O.S. (New Old Stock) Replica
Pros: Exact color codes and pin layouts match factory service documentation; familiar to legacy-equipment technicians.
Cons: PVC insulation degrades during warehouse storage (5–10 year shelf life); 40–60% premium over modern equivalents; failures during installation common when stock exceeds 8 years.
Choose when: Restoration project where authenticity matters; equipment with unusual connector pinouts only available as replica.
Custom Engineered Harness
Pros: Modern materials (TXL vs legacy GXL, Aptiv vs original Packard); 30–50% lower cost than OEM dealer; design modifications integrated (added circuits, relocated sensors); IATF 16949 quality documentation.
Cons: 8–16 week lead time for first production run; MOQ varies by manufacturer (typically 50–200 units for engine harnesses, 1+ for prototype).
Choose when: Equipment manufacturer building production volumes; aftermarket performance build; engine swap; fleet operator with recurring failure mode in specific harness.
Generic Import Harness ($150–$400 range)
Pros: Lowest upfront cost.
Cons: Uncertified wire (often Chinese GB/T spec, not SAE), no-name connectors, crimp pull tests failing at 30–50% of SAE spec, no traceability, average failure within 18–36 months.
Choose when: Never. The $200 saved on the harness costs $3,000 in callback warranty labor.
Engine Wiring Harness Maintenance — Extending Service Life
A well-built engine harness lasts 10–15 years. Basic maintenance can push it to 20+. Neglect cuts it to 5–7.
Annual Inspection Checklist (15 Minutes)
- Visually inspect all visible harness sections for cracked insulation, particularly near exhaust manifolds and valve covers
- Check all connector seals for cracking or hardening (squeeze gently — they should still flex)
- Verify ground strap connections are clean, tight, and corrosion-free
- Inspect grommets at firewall pass-throughs for cracks or displacement
- Test battery terminals for corrosion (white/green powder); clean with baking soda solution
- Pull-test 3–5 random connectors — should snap firmly, no movement
Every 60,000 Miles or 5 Years
- Apply dielectric grease to all engine bay connectors after disconnection
- Replace battery terminal protectors (rubber boots) showing UV degradation
- Re-secure any zip ties or harness clips that have loosened
- Replace any visibly degraded heat shielding around exhaust-adjacent runs
What to Avoid
- Pressure washing the engine bay — Drives water past connector seals. Use compressed air and engine degreaser instead.
- Cheap connector “test” probes — Backprobing with sharp needles damages connector seals permanently. Use proper test leads with insulated probes.
- Zip-tie repairs — Never use electrical tape or butt connectors as permanent repairs. Use heat-shrink solder splices or OEM-spec crimp terminals only.
- Aftermarket alarm/audio installations — 80% of mysterious harness failures we see in customer support trace back to non-professional aftermarket wiring tapped into the engine harness.
Custom Engine Wiring Harness Manufacturing at OUKETECH
OUKETECH manufactures engine wiring harnesses and broader vehicle electrical assemblies for OEMs, aftermarket performance shops, agricultural equipment manufacturers, and specialty vehicle builders across 70+ countries. Our 5,000 m² facility operates under IATF 16949 (automotive), ISO 9001 (quality), and ISO 13485:2016 (medical) certifications.
What We Build
- Automotive engine harnesses for passenger vehicles, commercial trucks, and motorcycles — see our full automotive wiring harness capabilities
- Agricultural engine harnesses for tractors, combines, sprayers, and harvesters operating in dust, mud, and chemical exposure — built to agricultural wire harness specifications
- Industrial engine harnesses for generators, pumps, compressors, and stationary engines — integrated as part of larger industrial wire harness systems
- Marine engine harnesses with tinned copper conductors and fully sealed connectors for saltwater environments — see our marine wiring harness capabilities
- Performance / motorsport harnesses with Tefzel insulation, Deutsch Autosport connectors, and complete shielding for race applications
Our Quality Standards
- 100% electrical testing on every harness before shipment (continuity, hipot, insulation resistance)
- Crimp force monitoring on every terminal during production
- Component-level traceability with wire lot codes and connector batch records
- IPC/WHMA-A-620 Class 2 or Class 3 workmanship per customer specification
- 24/7 global engineering support with 12-hour response guarantee
What You Get
- Design support from prototype through PPAP for OEM programs
- Reverse engineering of legacy harnesses for production replacement programs
- MOQ flexibility from 1-piece prototypes to 100,000+ unit annual production
- Material upgrades over legacy OEM specs (TXL vs GPT, sealed Aptiv vs original Packard)
Frequently Asked Questions
How long does an engine wiring harness last?
10–15 years in normal service, 20+ years with good maintenance in dry climates, 5–8 years in heavy-duty salt-belt service. Quality of original materials matters more than mileage — a well-built harness will outlast a poorly-built one by 2–3×.
Can I drive with a damaged engine wiring harness?
If you smell burning plastic, see smoke, or have melted insulation visible — no, stop immediately. With minor symptoms (occasional check engine light, intermittent codes), drive directly to a shop. Don’t ignore it; harness failures cascade into ECU and sensor damage that multiplies repair costs.
Is it worth replacing the engine harness on an old car?
Depends on vehicle value. Replace if: vehicle is worth $5,000+, mechanically sound otherwise, and harness replacement cost is under 20% of vehicle value. Otherwise, consider it the trigger for replacement. For collector or restoration vehicles, custom-built harness is the standard choice.
What’s the difference between an engine harness and a chassis harness?
Engine harness routes circuits between the ECU and engine-mounted components (sensors, injectors, coils). Chassis harness routes circuits along the frame to peripheral systems (tail lights, fuel pump, ABS sensors). They’re separate assemblies that connect at the bulkhead, allowing replacement of one without disturbing the other.
Can the same engine harness fit different model years?
Sometimes, but rarely without modification. ECU pinouts, sensor types, and routing change frequently between model years. Always verify by ECU part number and harness OEM part number, not just vehicle make/model/year. Custom harness manufacturers can build to specific ECU and sensor combinations regardless of original vehicle pairing.
What’s the difference between IATF 16949 and ISO 9001 for harness manufacturers?
ISO 9001 is general quality management. IATF 16949 adds automotive-specific requirements: PPAP (Production Part Approval Process), APQP (Advanced Product Quality Planning), MSA (Measurement System Analysis), and statistical process control. For OEM automotive work, IATF 16949 is mandatory — ISO 9001 alone is not enough.
How long does a custom engine harness take to manufacture?
For prototype: 2–4 weeks after design approval. For first production run: 8–16 weeks including tooling, sampling, and PPAP if required. Repeat production: 4–8 weeks with tooling in place. Plan inventory accordingly.
Conclusion
The engine wiring harness is the most environmentally stressed electrical assembly in your vehicle — and the single component whose quality differential between OEM-grade and cheap import is most consequential. A well-built engine harness using TXL insulation, sealed Aptiv/TE/Molex connectors, and certified crimp processes will outlast the vehicle’s drivetrain. A $200 import made with substandard wire and counterfeit connectors will fail within 18 months and take an ECU with it.
Whether you’re an equipment manufacturer specifying production harnesses, a fleet operator managing recurring failures, or an enthusiast building a custom engine, get the specifications right before the price negotiation. Wire gauge, insulation temperature rating, connector brand, crimp pull force data, and IATF 16949 certification all matter more than the line-item cost.
OUKETECH builds engine wiring harnesses for OEMs, aftermarket performance, agricultural, marine, and industrial applications — backed by 15+ years of experience, IATF 16949 certification, 100% electrical testing, and global engineering support. Contact OUKETECH to discuss prototype development, production volume requirements, or reverse engineering of legacy harnesses for current production needs.