Table of Contents
- What Is Heat Shrink Tubing?
- Key Specifications: How to Choose the Right Heat Shrink Tubing
- Materials Comparison
- Common Applications
- Uncommon but Practical Applications
- How to Use Heat Shrink Tubing (Step-by-Step)
- Common Mistakes to Avoid
- Heat Shrink Tubing in Wire Harness Manufacturing
Introduction
A single exposed wire joint can shut down an entire assembly line.
That’s not hyperbole. It happens every day in factories, on construction sites, and under vehicle hoods. Heat shrink tubing exists to prevent exactly that failure.
Heat shrink tubing is a polymer sleeve that contracts radially when heated, forming a tight, protective seal around wires, cables, and connectors. This guide covers what it is, how to pick the right type, which materials suit which environments, and how professionals use it in wire harness manufacturing. If you’re an engineer, technician, or procurement manager who needs to spec heat shrink correctly the first time, this is for you.
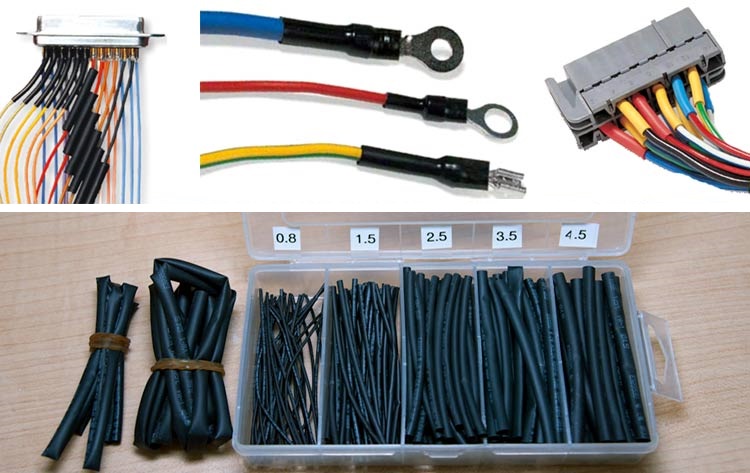
What Is Heat Shrink Tubing?
Heat shrink tubing is extruded thermoplastic tubing that has been cross-linked and expanded, then cooled in its expanded state. When you apply heat above a specific threshold (typically 90°C to 120°C depending on the material), the tubing releases its stored mechanical stress and shrinks back toward its original extruded diameter.
The physics behind it is straightforward: cross-linking creates molecular bonds between polymer chains. After the tubing is extruded, manufacturers bombard it with electron beams or chemical agents to create these cross-links. Then they heat the tubing, expand it with air pressure, and cool it rapidly. The cross-links lock in the expanded shape temporarily. Reheating breaks those temporary constraints, and the polymer chains snap back to their relaxed state.
A detail that matters in practice: heat shrink tubing shrinks radially, not longitudinally. You’ll see maybe 5–10% length reduction at most, which is predictable and manageable. If you need a 2-inch sleeve after shrinking, cut it to about 2.2 inches.
The manufacturing flow looks like this: extrusion → cross-linking (electron beam or chemical) → heating and expansion → rapid cooling. The result is a tube that sits on a spool in its expanded state, ready to shrink when you need it.
Key Specifications: How to Choose the Right Heat Shrink Tubing

Most selection mistakes come from skipping the specs. Here’s what actually matters.
Shrink Ratio
The shrink ratio tells you how much the tubing diameter will reduce. It’s expressed as the ratio of supplied ID (inner diameter) to recovered ID.
2:1 is the workhorse. A 2:1 tube shrinks to half its supplied diameter. Use it for straight wire splices, simple insulation repairs, and uniform-diameter objects. It’s the most common ratio and the cheapest.
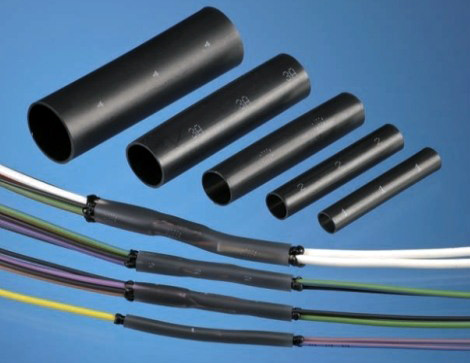
3:1 works well for connectors and terminals where the wire body is significantly thinner than the connector head. The extra shrink range lets the tubing grip both the thin wire and the wider connector body.
4:1 is needed when you’re covering components with large diameter differences, like a small-gauge wire entering a bulky connector or a splice where one side is much thicker. Adhesive-lined 4:1 tubing is standard for underground and marine splices.
6:1 is specialized. Used for sealing multi-wire transitions, irregular shapes, and large connector backshells. The high shrink ratio lets one piece cover what would otherwise need multiple sizes. Common in aerospace and military harnesses.
Wall Thickness
After shrinking, wall thickness determines mechanical protection and dielectric strength.
- Thin-wall (0.4–0.8mm recovered): General electrical insulation, cable bundling, light abrasion protection. Most common in electronics and appliance wiring.
- Medium-wall (0.8–1.5mm recovered): Better cut-through and abrasion resistance. Used in automotive engine bays and industrial machinery.
- Thick-wall (1.5mm+ recovered): Heavy-duty mechanical protection. Used for direct-burial splices, submersible pumps, and mining equipment. Often adhesive-lined for environmental sealing.
Diameter Selection
The 80/20 rule works reliably: pick tubing with a supplied ID about 20% larger than the largest diameter you need to cover. This gives enough clearance to slide the tubing on while ensuring it shrinks tight.
Measure the widest point of whatever you’re covering. That’s your minimum supplied ID. Then check the tubing’s recovered ID (after full shrinkage) against the smallest diameter in your assembly. The recovered ID must be smaller than that minimum. Otherwise the tubing won’t grip.
For irregular shapes, step up one shrink ratio. A 3:1 tube handles moderate diameter variation; 4:1 handles most connector-to-wire transitions.
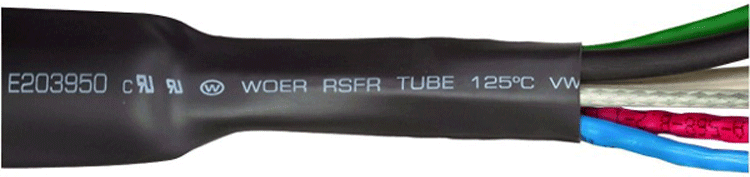
Operating Temperature Range
Match the tubing’s continuous-use temperature rating to your environment:
- -55°C to 135°C: Standard polyolefin covers most indoor and general outdoor use
- -55°C to 150°C: High-temp polyolefin for engine compartments
- -70°C to 260°C: PTFE/FEP for extreme heat (aerospace, industrial ovens)
- -50°C to 200°C: Silicone for flexibility at both cold and hot extremes
- -30°C to 105°C: PVC for budget indoor applications only
Chemical and UV Resistance
If the tubing lives outdoors, UV resistance matters. Standard black polyolefin handles UV well; clear and colored versions degrade faster. For direct sunlight, specify UV-stabilized grades.
Chemical exposure is trickier. Polyolefin resists most common chemicals but softens in contact with fuels and oils. For fuel lines, engine bays, and hydraulic equipment, use Viton or PTFE. For battery acid environments, PTFE is the only reliable choice.
Materials Comparison
| Material | Max Continuous Temp | Shrink Temp | Key Properties | Best For | Limitations |
|---|---|---|---|---|---|
| Polyolefin (PO) | 125–135°C | 90–120°C | Good all-around, flame-retardant, UV-stable in black | General electrical, automotive, appliance | Not fuel-resistant, limited to 135°C |
| Adhesive-Lined Polyolefin | 125–135°C | 110–135°C | Dual-wall with hot-melt inner layer, waterproof seal | Marine, underground, outdoor splices | Bulkier, more expensive, slower to shrink |
| PVC | 105°C | 100°C | Low cost, good clarity, flexible | Indoor low-voltage, labeling, budget projects | Low temp ceiling, degrades in UV, toxic fumes if burned |
| PTFE | 260°C | 327°C | Near-universal chemical resistance, highest temp rating | Aerospace, medical, chemical processing | Expensive, requires high-temp heat gun, stiff |
| FEP | 200°C | 190°C | Similar to PTFE but clearer, lower shrink temp | Medical devices, food equipment, lab wiring | More expensive than polyolefin, less flexible |
| Silicone | 180–200°C | 120–150°C | Extremely flexible, medical/food grade available | Medical devices, food processing, flexible joints | Low tear strength, poor abrasion resistance |
| Viton (FKM) | 200°C | 150–175°C | Excellent oil and fuel resistance | Automotive fuel systems, hydraulic lines | Expensive, limited shrink ratios |
Polyolefin handles 80% of applications. It’s affordable, reliable, and stocked in every size and color. Adhesive-lined polyolefin is the upgrade path when you need waterproofing. The inner adhesive melts during shrinking and flows into gaps, creating a seal that passes IP67 submersion tests.
PTFE and FEP live at the opposite end of the spectrum. You spec these when polyolefin would melt, when chemical resistance is non-negotiable, or when you’re building something that flies at 40,000 feet. The shrink temperature for PTFE (327°C) means you need a serious heat gun. A hardware store model won’t cut it.
Viton fills the gap between polyolefin and PTFE for automotive work. If the tubing will sit in an engine bay near fuel lines, Viton is the answer. It costs more than polyolefin but less than replacing heat-damaged wiring.
Common Applications
Electrical Insulation
The most basic use: slide heat shrink over a soldered or crimped wire splice, apply heat, and you’ve got a dielectric barrier that prevents shorts and arc faults. In professional wire harness manufacturing, every splice gets heat shrink. It’s not optional. For OEM cable manufacturers, this is standard practice on every assembly that leaves the floor.
Cable Bundling and Organization
Heat shrink tubing keeps wire bundles tidy. Instead of zip ties every six inches, a single piece of large-diameter tubing can bundle an entire harness branch. It’s cleaner, won’t snag during installation, and adds a layer of abrasion protection. Custom cable assemblies use this technique extensively to produce harnesses that route cleanly through tight equipment enclosures.
Strain Relief
Where a wire enters a connector, repeated flexing eventually breaks conductors. A properly sized piece of heat shrink extending from the connector body onto the wire creates a graduated stiffness transition. The tubing absorbs the bending stress instead of concentrating it at the solder joint or crimp. This is standard practice on custom wiring harnesses built for industrial equipment that sees constant vibration.
Environmental Sealing
Adhesive-lined heat shrink creates a moisture-proof, dust-proof seal around splices and terminals. In marine wiring harness applications, every connection point gets dual-wall heat shrink. Saltwater spray and humidity will find any gap. The same principle applies to agricultural wire harnesses, where equipment operates in mud, fertilizer runoff, and pressure-wash conditions.
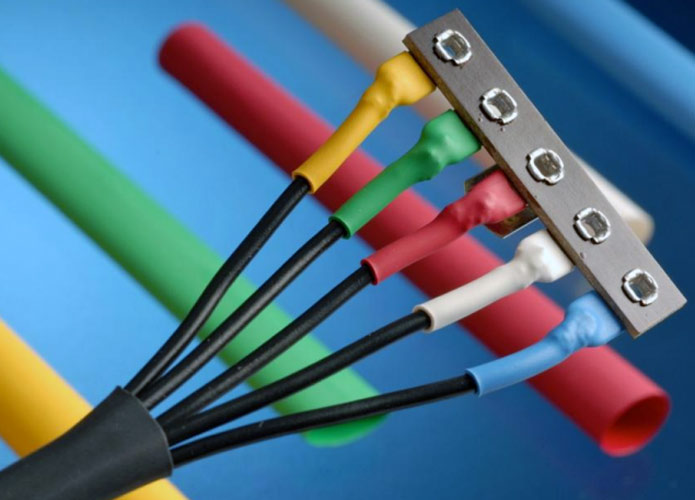
Wire Identification
Color-coded heat shrink makes wire identification permanent. Print or write on the tubing before shrinking, and the markings stay legible for the life of the harness. Better than adhesive labels that peel off in heat, and more durable than ink that fades under UV. Yellow/green striped tubing is the international standard for ground/earth conductors.
Automotive and Trailer Protection
Under-vehicle wiring lives in a brutal environment: road salt, gravel impact, temperature swings from -30°C to 80°C. Trailer wiring harnesses take this abuse plus constant flexing at the hitch point. Heat shrink, especially adhesive-lined, is the standard protection method for every splice and terminal in these applications.
Uncommon but Practical Applications
Not every use for heat shrink tubing involves electricity. Here are a few creative applications that work surprisingly well.
Sports equipment grip enhancement: A layer of heat shrink over a tennis racket or fishing rod handle adds grip without the bulk of overwrap tape. The textured surface of some heat shrink grades provides decent friction even when wet.
Eyeglass frame repair: A snapped eyeglass arm can be splinted with a short piece of heat shrink. It’s not a permanent fix, but it’ll get you through the day. And it’s less conspicuous than tape.
Phone charger cable reinforcement: The failure point on most charging cables is where the cable meets the connector. A 2-inch piece of heat shrink over that junction, extending onto both the connector body and the cable, doubles the cable’s lifespan. Use 3:1 ratio tubing so it grips both the thin cable and the wider connector.
Fishing rod repair: Broken rod tip guides can be re-secured with heat shrink. The tubing holds the guide in place and adds a smooth transition that won’t catch the line. Not tournament-legal for competitive anglers, but perfectly functional for weekend fishing.
Shoelace tip replacement: The plastic aglet at the end of a shoelace eventually cracks and falls off. A 15mm piece of heat shrink makes a replacement that’s more durable than the original. Clear tubing lets the lace color show through.
Key silencing: Keys jangling in your pocket? A single layer of heat shrink over each key head eliminates metal-on-metal contact. It’s quieter than a key cover and doesn’t add bulk. Replace every few months as it wears through.
How to Use Heat Shrink Tubing (Step-by-Step)
- Measure and Select SizeMeasure the largest diameter you need to cover. Pick tubing with a supplied ID at least 20% larger than that measurement. Check that the recovered ID is smaller than your smallest diameter. For connector-to-wire transitions, 3:1 or 4:1 ratio tubing handles the diameter step.
- Cut to LengthCut the tubing 10% longer than the area you need to cover. The 5–10% longitudinal shrinkage during heating means a 50mm cut piece ends up around 45–47mm. For adhesive-lined tubing, add an extra 5%. The adhesive flow needs room.
- Clean the SurfaceDirt, oil, and flux residue prevent proper adhesion and can cause the tubing to slide after shrinking. Wipe the area with isopropyl alcohol. For adhesive-lined tubing, a clean surface is the difference between a waterproof seal and a leak path.
- Position the TubingSlide the tubing over the joint or connector. Center it so the overlap extends equally on both sides. For splices, the tubing should extend at least 10mm past the exposed conductor on each side.
- Apply Heat EvenlyUse a heat gun, not a lighter. A heat gun gives you controlled, even heat at the right temperature. Start at the center and work outward. This pushes air out instead of trapping it. Keep the gun moving; don’t hold it in one spot. The tubing will shrink visibly, then the surface will gloss over slightly when fully recovered.For adhesive-lined tubing, watch for a small bead of adhesive appearing at both ends. That’s your signal that the inner layer has melted and flowed completely.
- Cool NaturallyLet the tubing cool at room temperature. Don’t touch it while it’s hot. The polymer is still soft and can be deformed. Don’t quench it with water either; rapid cooling can create stress cracks. Give it 30–60 seconds, and it’ll be ready.
Common Mistakes to Avoid
Wrong size selection
The most frequent error. Tubing that’s too large won’t shrink tight enough. Tubing that’s too small won’t fit over the connector. Measure twice, check the spec sheet once.
Using an open flame
Lighters and matches produce uneven heat, soot, and temperatures well above what the tubing is rated for. You’ll get scorch marks, inconsistent shrinkage, and potentially a fire hazard. Use a heat gun.
Overheating
Holding the heat gun in one spot too long chars the tubing, makes it brittle, and can melt the wire insulation underneath. If you see smoke or discoloration, you’ve gone too far. Cut it off and start over.
Insufficient overlap at joints
The tubing needs to extend past the exposed conductor or connector body on both sides. Skimping on overlap leaves edges that can catch, peel, or let moisture in. Minimum 10mm overlap on each side for electrical splices.
Skipping surface prep
Heat shrink won’t bond to a greasy surface. Adhesive-lined tubing especially needs a clean substrate. The 30 seconds you save by not wiping down the joint costs you a seal that fails in the field.
No labeling after installation
Once the tubing is shrunk, you can’t see what’s inside. Label the wire or add a printed marker before shrinking. Tracing unlabeled wires through a harness six months later is a waste of time that’s completely avoidable.
Heat Shrink Tubing in Wire Harness Manufacturing
In a professional wire harness shop, heat shrink tubing isn’t an afterthought. It’s specified at the design stage, sourced by part number, and applied to documented standards.
The governing standard for cable and wire harness assemblies is IPC/WHMA-A-620. Class 2 covers industrial and commercial products where continuous performance is required but some cosmetic imperfection is acceptable. Class 3 covers products where performance on demand is critical: medical devices, military equipment, flight controls. The acceptance criteria are tighter. For Class 3 harnesses, heat shrink must fully recover without bubbles, burns, or adhesive gaps. Every piece gets inspected.
Heat shrink works alongside other protection methods in a complete harness design. Braided sleeving provides bulk abrasion resistance for entire harness branches. Split conduit adds crush protection in high-traffic areas. Overmolded cable assemblies seal entire connector interfaces in a single molded jacket, a step beyond what heat shrink alone can do. The choice between heat shrink and overmolding comes down to production volume and environmental severity. Heat shrink is faster and cheaper for low-to-medium volumes and field repairs. Overmolding delivers a more robust seal for high-volume production but requires tooling investment.
For a deeper look at how these protection methods fit into complete harness designs, see our guide to understanding wiring harnesses. Our custom wiring harnesses integrate heat shrink, braided sleeving, and overmolding based on the specific demands of each application, whether that’s a marine wiring harness built for saltwater exposure, a trailer wiring harness designed for road debris and vibration, or an agricultural wire harness that has to survive pressure washing and chemical exposure.
Conclusion
Heat shrink tubing solves a simple problem well: protecting electrical connections from the environment. The key decisions are material, shrink ratio, and wall thickness. Get those right, and the rest is execution.
When should you use heat shrink versus alternatives? For individual splices and terminals, heat shrink is the answer. It’s fast, reliable, and cheap. For entire connector interfaces in high-volume production, overmolding makes more sense. For bulk harness protection against abrasion, braided sleeving wins. And for temporary field fixes, electrical tape still has its place. Just don’t confuse it with a permanent solution.
Need help specifying the right protection for your wire harness?
OUKETECH’s engineering team builds custom harnesses for automotive, marine, agricultural, and industrial applications — every one with heat shrink applied to documented quality standards. Contact us to discuss your project.